A Range Bar Chart (RB) is a specific chart that depends on the price change and is independent of the time at which this change occurs, because successive candles called in this case range bars have the same size in pips (determined by setup parameters of the script generating the chart). In case of traditional charts using Japanese candles, the size of the candle shows what happened to the price during a unit of time e.g. 1, 5, 30, 60 minutes. In case of RB – each candle has the same size, but the number of candles depends on the market volatility and the size in pips which can be set by trader by any means.
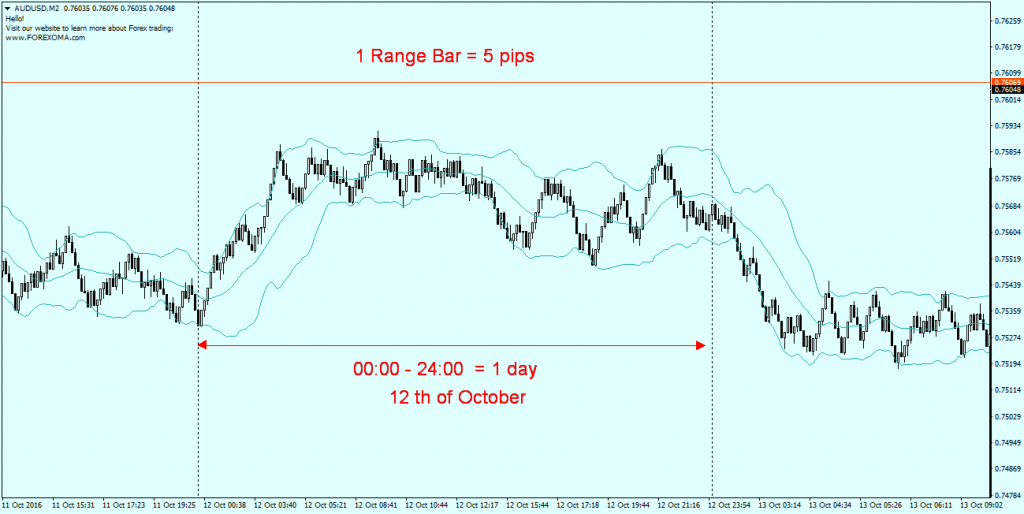
In the charts below you can see that when the volatility is low between 0:00 and 8:00 a.m. the RB chart takes up little space, whereas when the volatility is high – the situation is the opposite, because what on the M5 regular chart takes up 6 candles, in the case of the RB chart is 62 candles (range bars). In this case the preset RB size = 5 pips. Of course it is possible to take any size of RB, it depends on the user and what strategy he will use the chart for.
The system for scalping using the Bar Range Chart includes:
- a script (plugin) to MT4 generating a Range Bar Chart
- Bollinger Bands indicator (already in the MT4 platform indicators)
- the indicator that draws the Supply and Demand zones
- MACD indicator (12,26,1)- optional version changing colours when passing through maximum or minimum, can be replaced by Awesome Indicator.
Items 1, 3, 4 – can be found on the Internet as freeware.
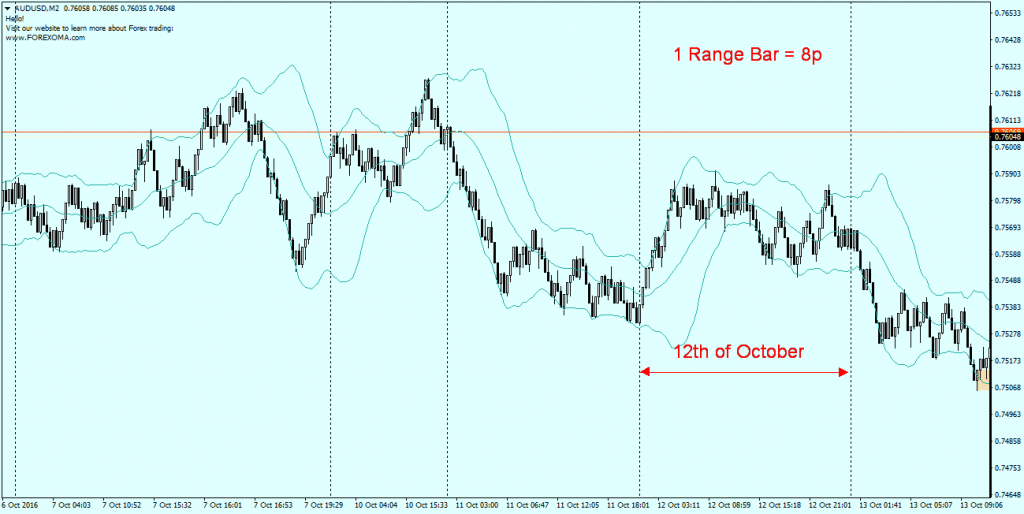
The RB size that we set in the script settings (1) depends on the prey we are hunting for. If we plan to scalp 5-15 pips for a trade, the most appropriate RB size will be 3-5 pips, while if we expect more, e.g. 15-30p, the RB should be about 7-10p. Of course, these are approximate sizes, depending also on the volatility of the instrument. From my several years of observations on crosses with higher volatility e.g. EURJPY and GBPJPY, the RB size should be at least 5-7p, but consequently TP will be at least 15-20p. On major currency pairs the RB size can be smaller like 3-5p. Simplifying – scalping with this strategy we can count on profit being 3x RB.
As the RB size increases, we reduce the number of setups, but the range of TP and SL increases, and so with RB=3-5p we can count on 2-3 setups per day… and with 7-10p it can be 4-5 per week.
This is the AUDUSD chart for RB=5 pips:
Chart AUDUSD RB=8 pips
In the case of scalping, when expecting 6-12 pips, RB= 3-5 pips are the best choice.
The assumptions of the strategy
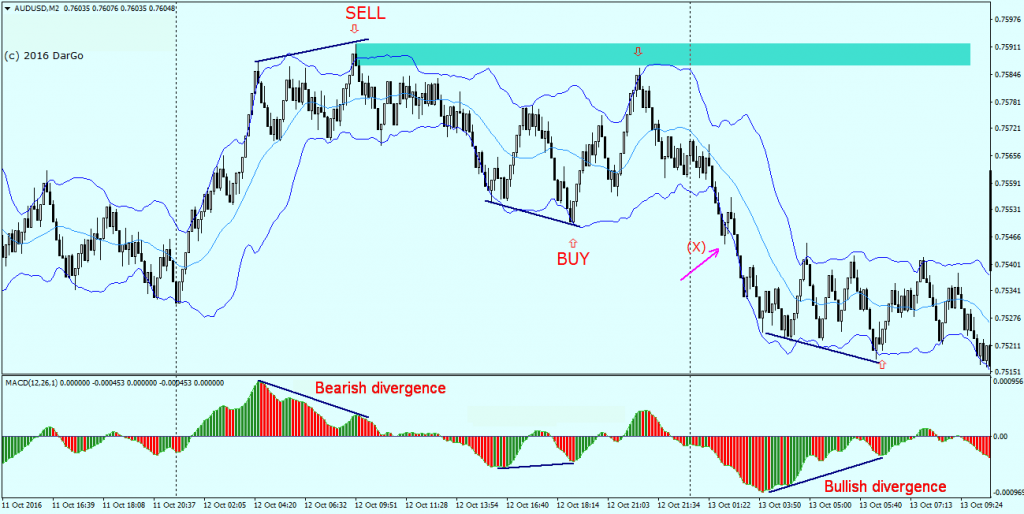
Below, the example of a RB=5p chart with the indicators shown shows the rules of trading.
Above is a chart RB=5 with Bollinger Bands, SD zone indicator and MACD indicator.
The following conditions should be met in order to consider that the situation on the pair is ready for the SELL order:
1) The range bar pierces the upper limit of the Bollinger band, preferably when it takes the shape of a small bearish pinbar (turns black).
2) A new local maximum is created and the line connecting this maximum to the previous high creates a bearish divergence with the line connecting the peaks of the MACD chart
3) It’s good when it’s at the Supply or Demand level (blue stripe) or the zone has just started to form.
Conditions 1) and 2) must be met!,… 3) – good when it is present, but not necessary.
In the case of a BUY signal, we are interested in the lower limit of the Bollinger band and the minimums and the bullish divergence that forms on it.
Additionally, the efficiency of the input increases when:
- The breakthrough of the Bollinger Band’s boundary occurs when it has a small angle of inclination…preferably almost horizontal. Avoid inputs when the lines are steep as marked (X) in figure 4.
- the input is consistent with the current trend (if any exists)
Let’s also pay attention to the MACD chart – here we have a version changing the colour of the “bar” to red if the previous one had a higher value or to green if it is higher than the previous one. This is helpful because it makes it easier for us to catch the moment when a divergence is formed.

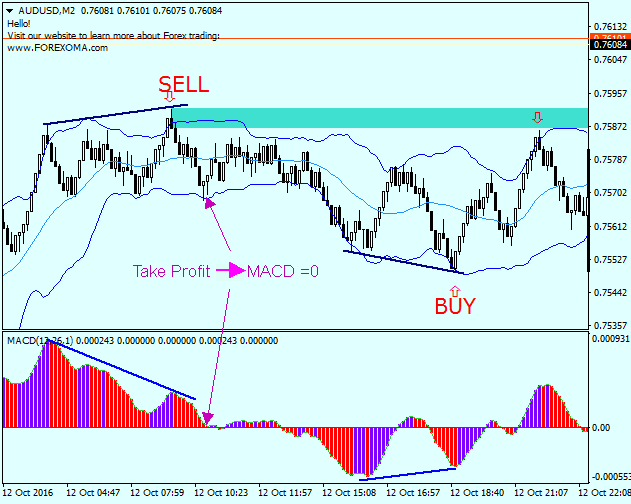
As you can see in Fig. 5, the determination of the moment of market entry is quite precise, whereas it is more difficult to determine the moment of exit, i.e. where to set Stop Loss (SL) and Take Profit (TP)?
And there’s room for some flexibility. Depending on a trader’s endurance and experience it is either possible to close when the price reaches the middle line of the Bollinger’s ribbon, which gives an average statistical Risk/Reward of 1:1.5-2.0 and a 70-75% probability (it is statistically confirmed on backtests), or to set the risk level to something more risky and close when the price reaches the opposite line of the outer ribbon, which happens less often (about 65%) but often raises the R/R to = 1:3 and more.
SL I recommend to place 1-1,5 RBar over the local top (hole). When entering SD zone – 1 RB above the zone boundary at Sell (or below at Buy).
You can also follow the MACD chart and close the order when its value reaches = 0 or when it starts to move to the other side of the line marking level 0.
To sum up the above – it is a system requiring constant chart monitoring, designed for traders – “hunters” who like to spend many hours with charts and hunt for opportunities, because it is difficult to predict well in advance at which level a break-out from the Bollinger band will occur and whether it will coincide with the creation of divergence. In my experience I know that with self-discipline and following the rules of the system, it is possible to achieve results of up to 30% of growth of the capital in a month…
*indicators required to prepare chart to this Range Bars Scalping strategy are here: DargoRBScalp
Here you will find the video instruction how to prepare Range Bars chart:
https://www.youtube.com/watch?v=N0IL9VNsDtk&t=19s
©2016 DARGO
In our Facebook group, which you can join anytime: https://www.facebook.com/groups/328412937935363/ you will find 5 simple strategies on which my trading is based. There, every day we post fresh analyses of currency pairs and commodities


